 Arpeggio patterns are a useful skill for any guitar player. These patterns help you outline chords in your solos, improve your technical skills, and can help you master the guitar fretboard as you learn them. Dominant 7th is the full name of a chord quality that you are probably already familiar with, whether you realize it or not. A G dominant 7th chord symbol would be G7. Most of us have learned these simply as "7th chords" - I'm going to be a little more specific in this lesson because there are different types of "7th chords" that you might learn later on. With arpeggio patterns, you are playing the notes from a chord one at a time - almost like a scale pattern. If you play a G7 arpeggio, you are playing a G7 chord in a way that you can use for playing melodies, riffs, or guitar solos. These arpeggio patterns will challenge your fingers to move in new ways, adding a new layer to your technical skills and abilities. By playing these arpeggio patterns from different starting notes on each string, you can play in any key, anywhere on the guitar fretboard. Dominant 7th arpeggio patterns are found in many musical styles, including jazz, rock, blues, country, and other popular styles. No matter what kind of music you want to play, these arpeggio patterns will come in handy. What Do You Need To Know?Knowing your major pentatonic scales will help you get these finger patterns down quickly. If you don't know major pentatonic scales yet, click here. Major 7th arpeggios are helpful if you're going to work on this lesson (especially if you're learning jazz guitar), but not essential. Click here to check out major 7th arpeggios. It will be really helpful if you know the notes along the guitar fretboard. Click here to get started if you don't know the notes on the neck yet. You can still do this lesson without learning the fretboard first - use the fretboard map below as a reference. 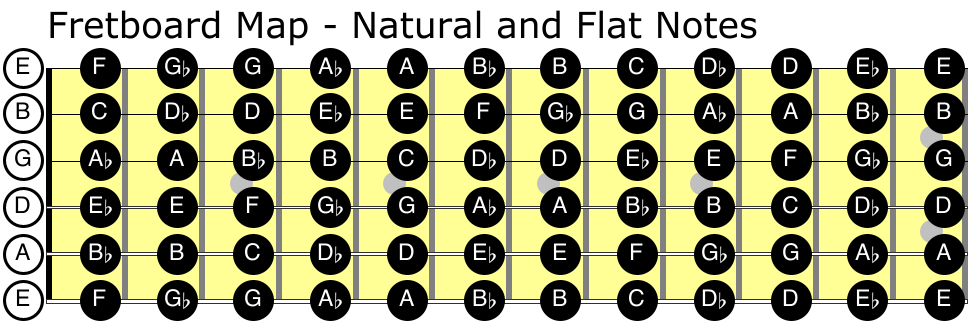 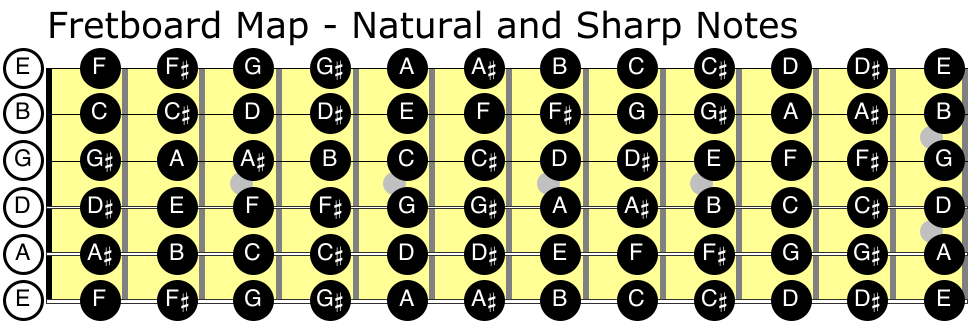 Quick Start GuideThe examples below will give you the basic finger patterns and practice examples so you can get started playing right away. Practice one pattern at a time, and follow along with the practice example as you get started. To learn more about the arpeggio patterns, practice strategies, and what makes them work, keep reading past these examples. 6th String Form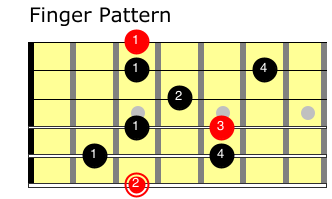 Practice Example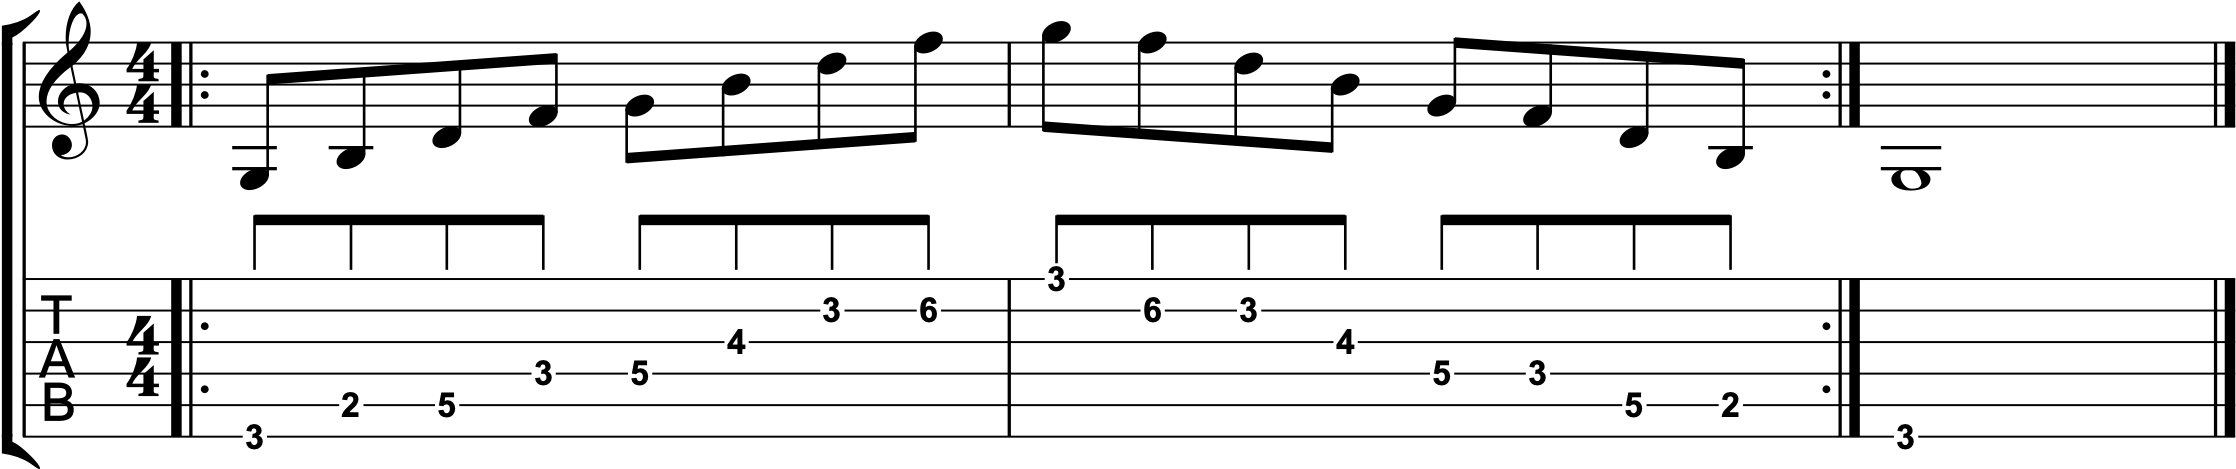 5th String Form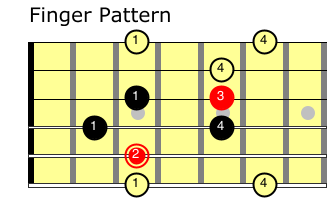 Practice Example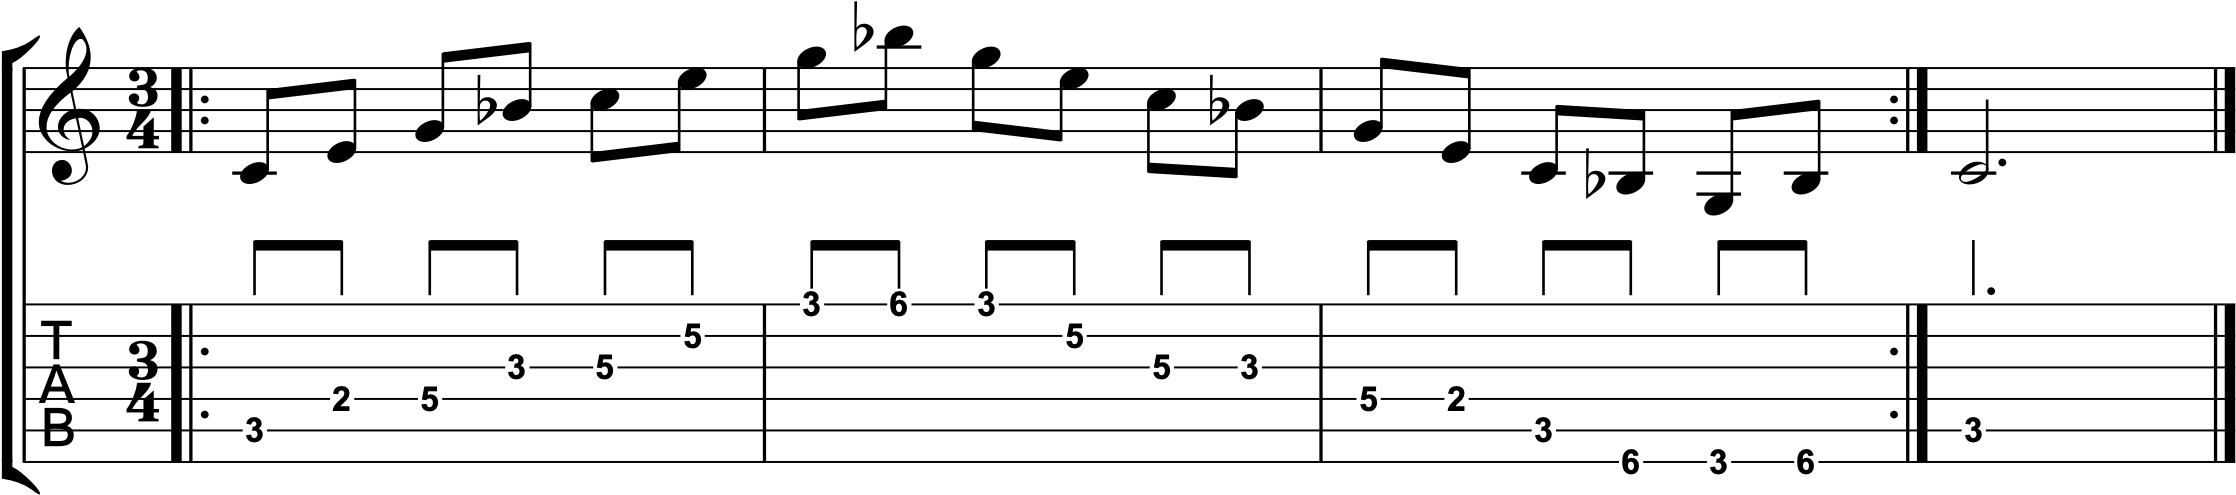 4th String Form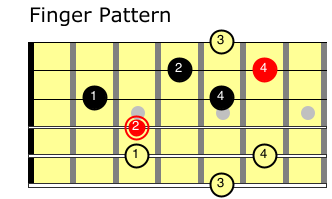 Practice Example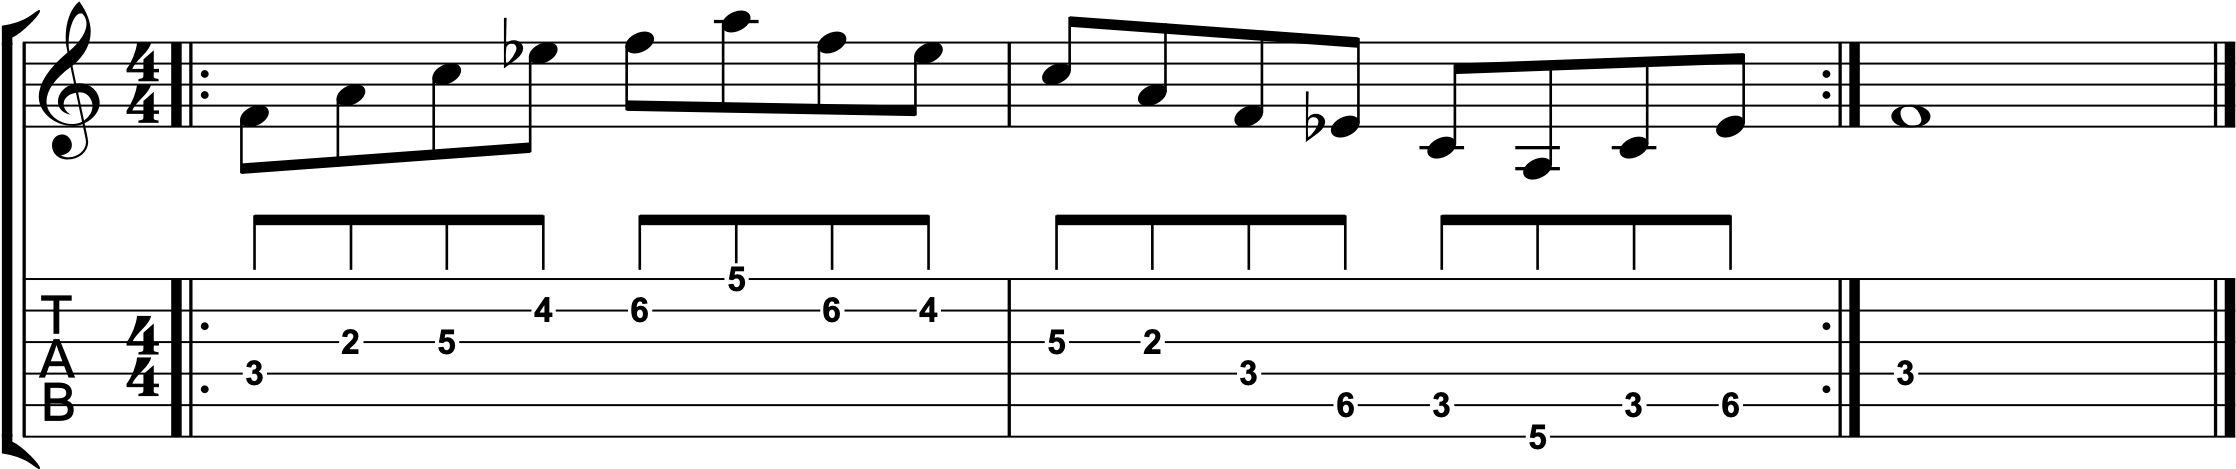 3rd String Form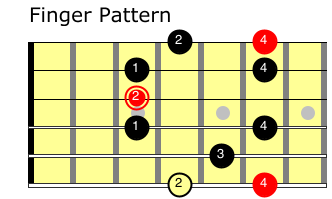 Practice Example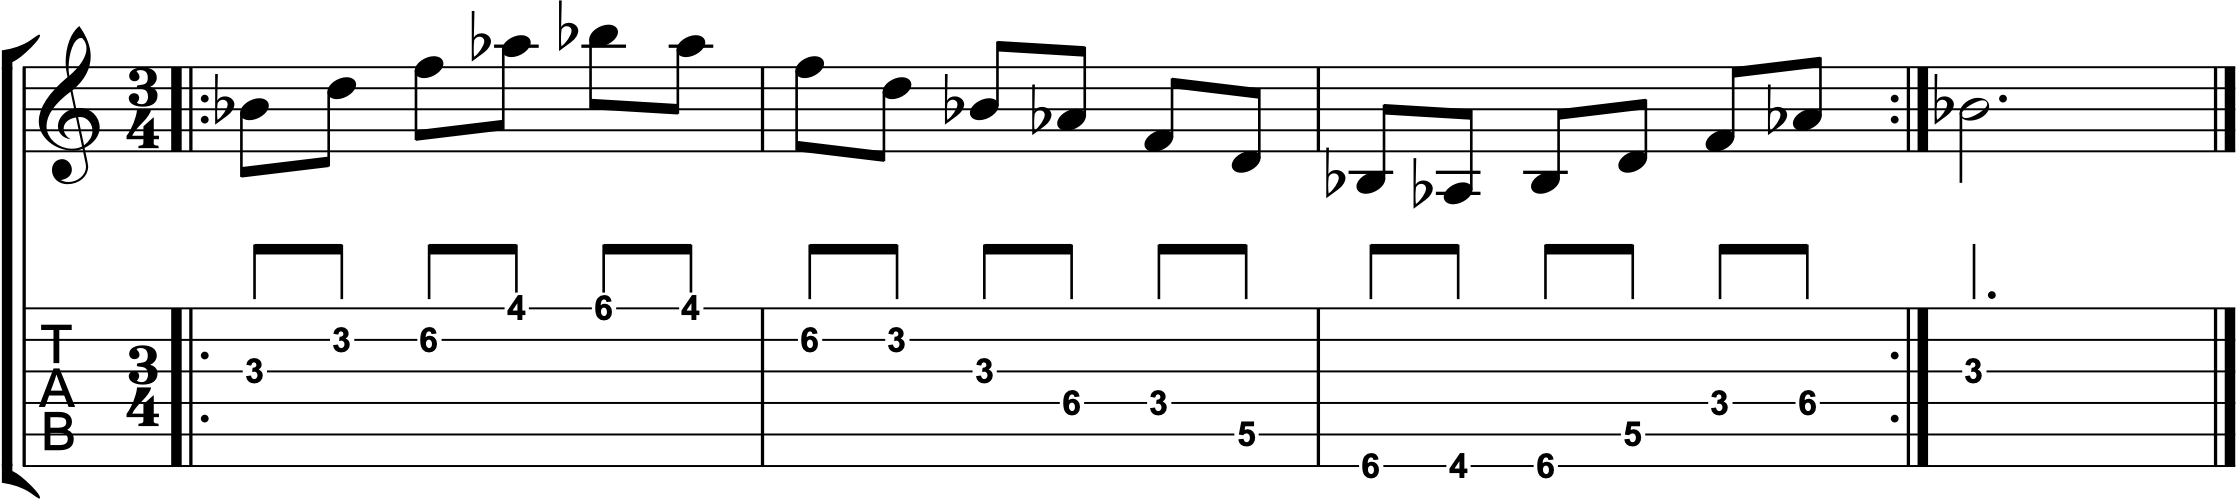 2nd String Form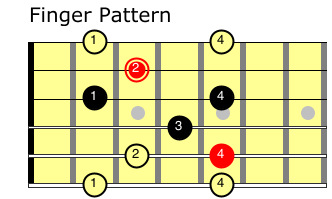 Practice Example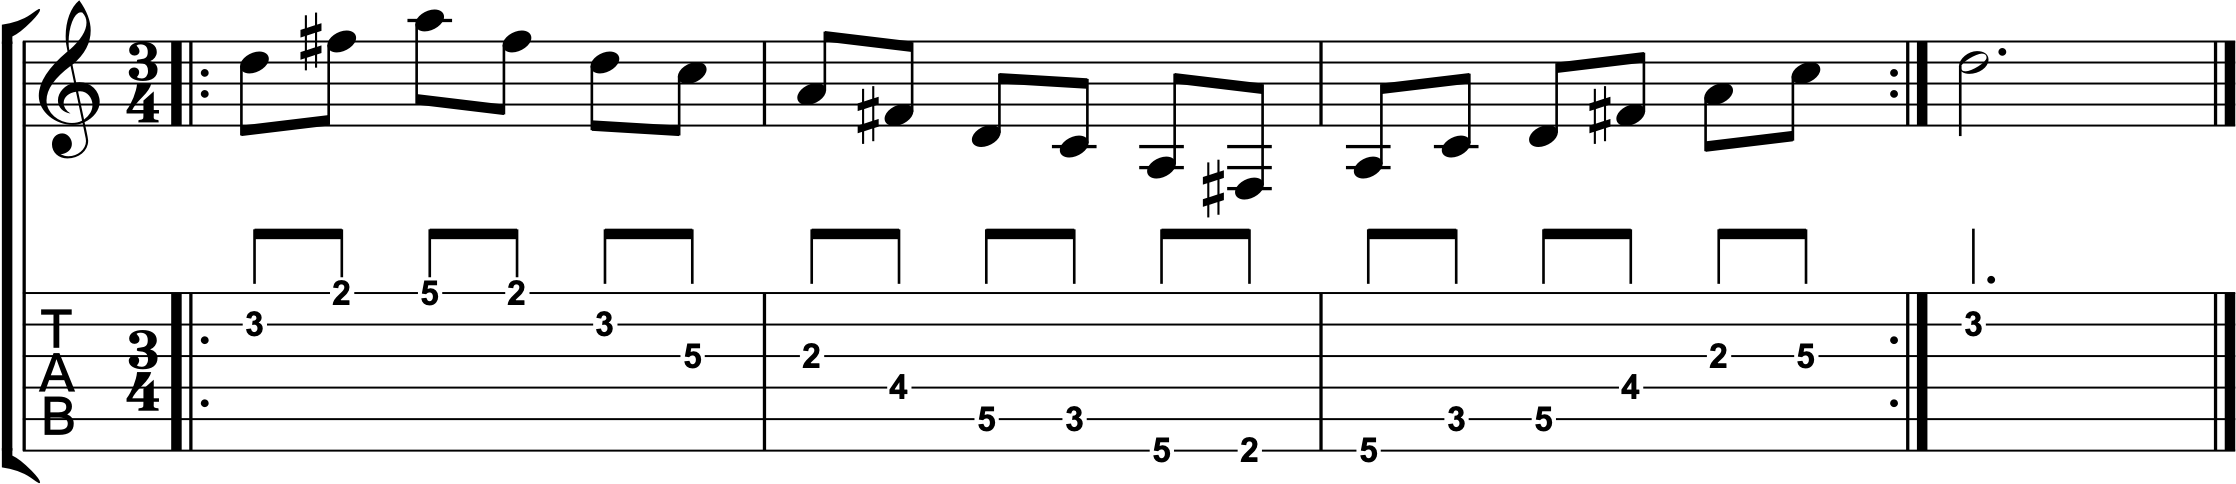 That's it - all 5 patterns. Being able to play these is a great place to start. Keep reading below to learn more about the fretboard mechanics, music theory, and practice advice for these arpeggio patterns. 5 Arpeggio PatternsThere are 5 common finger patterns for these 7th chord arpeggios, as shown above. They start on the 6th, 5th, 4th, 3rd, and 2nd strings. Some people like to break these arpeggio patterns down further, making even more options to practice. I prefer to keep things simple as much as possible. Nearly every possibility for playing your 7th arpeggios are contained in these 5 patterns, so there's no need to break things down further right now. I'd rather get really good at a few things and be able to use them in my playing than working a little bit on every variation I can some up with. Some people will disagree with me here (including teachers who I like and respect), but this approach has worked really well for myself and for my students over the years. 7th Arpeggio StructureArpeggios are basically chords that are played one note at a time. Sometimes guitar players will play arpeggios by holding down a chord shape and picking one string at a time. In this case, we're playing these as if they were a scale pattern - using one finger at a time. The dominant 7th arpeggio is made up of four notes: Root (1), Major Third (3), Perfect Fifth (5), and a Flat Seventh (b7) For those of you in theory class, the technical term is minor seventh - I use the term flat here because I feel that it applies more directly to the chord/arpeggio structure. Feel free to use whichever term makes the most sense to you. You'll find these intervals or chord tones labeled in the arpeggio patterns below. As the finger pattern becomes more automatic, put more of your attention into knowing what chord tone you are on as you play. Arpeggio Patterns With Chord Tones/Intervals6th String Form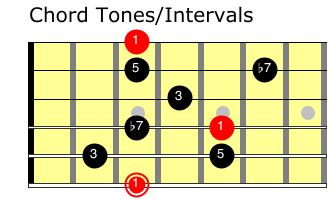 5th String Form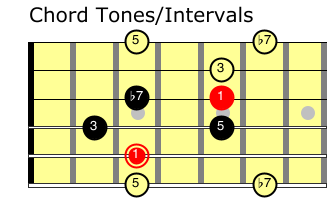 4th String Form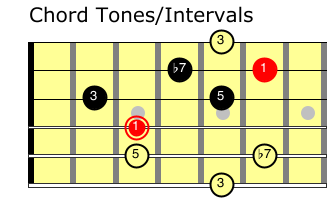 3rd String Form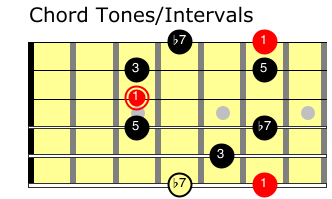 2nd String Form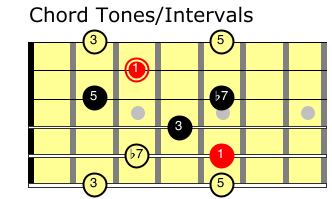 How To Practice These Arpeggio PatternsGo Slowly At FirstThese arpeggio patterns might be a little awkward until you get used to them on your own guitar. As a rule of thumb, go at a pace that feels easy for you. If you're making mistakes, you're going too fast. Speed will increase naturally as you become more familiar with how the arpeggio pattern feels on your guitar. The more familiar with the pattern you become, the faster your "easy" pace will naturally be. Going slower as you are learning gives your fingers a better chance to learn the pattern - it improves your muscle memory. If you want to take it to the extreme, try playing each note until it stops ringing before moving on to the next note. (This one is optional, but it is a good challenge for your attention span!) Play Each Pattern All Over The Guitar NeckUse the fretboard map from the beginning of this lesson to find specific keys to play your arpeggio patterns in so you can use them on specific songs. If you want to play A7 arpeggios, find an A on the 6th string and start your 6th string form there. Find an A on the 5th string and start your 5th string form there. Continue until you've practiced all 5 variations of the A7 arpeggio pattern. Play up and down the neck chromatically - one fret at a time. This is one of my favorite ways to get started - play the arpeggio, move up a fret, repeat. I like to start as low on the neck as I can without playing any open strings (usually the 2nd fretful these arpeggio patterns). I'll move up the neck one fret at a time until I've played 13 times. This is a good way to get the arpeggio pattern working on your guitar without thinking too hard. Eventually you can use this as a warmup, repeating the process with all 5 shapes. I do this kind of exercise all the time when I have downtime backstage before a performance, or while waiting for a rehearsal to start. It's a good way to keep your fingers moving and build up your ability to play for longer periods of time. Play with your arpeggio pattern, not just through it. There is an important distinction here - many of us just play through the pattern as an exercise and move on to the next key. While this is a good and important way to get the arpeggio pattern under your fingers, it doesn't really give you the whole picture of how to use it in your playing. Spend some time playing with your arpeggio pattern as well. Play the notes out of order, use different rhythms, or try to create an interesting melody using just your arpeggio pattern. You can find drum loops or backing tracks on youtube to make this even more interesting to practice. This is the missing link for a lot of players who practice their finger patterns, but feel lost when it's time to play a solo. How can you just come up with a solo on the spot if you never spend time messing around and creating melodies you like in practice? This simple process of playing with your arpeggio patterns will not only help you be able to use your arpeggios to play solos, it will help you learn the pattern on a much deeper level. Apply your arpeggio patterns to your music as soon as possible. If you're playing jazz, try playing the dominant 7th arpeggio pattern any time you see a 7th chord on a lead sheet or your jazz band music. Ex G7 - play a G dominant 7th arpeggio (any arpeggio pattern starting with G as the root note). If you're not into playing jazz guitar, try finding a blues backing track on youtube and play along. If the backing track is in G, try starting each arpeggio pattern from the G on that particular string and you'll be good to go. Getting your hands dirty by applying these to whatever songs you are playing will help you get a sense of when to play them, and help you make these arpeggio patterns a regular part of your guitar playing. Try This:Spend some time getting comfortable with each of these arpeggio patterns on your guitar.
A good place to start is to work only with the finger patterns to get used to the sequence. Once you can actually play the arpeggio pattern, the theory behind it is simply a label that will help you communicate these ideas to other musicians. Remember that playing is the important part - especially at first! After the arpeggio patterns start to become more automatic, challenge yourself by following along with the chord tones or intervals listed above (1, 3, 5, b7). These intervals tell you where each note sits in the arpeggio - the distance they are above the root of the arpeggio. Keep practicing, and let me know how it goes!
0 Comments
Your comment will be posted after it is approved.
Leave a Reply. |
